Objectives
Enable Songs and Playlists to be added via simple forms.
Exercise Solutions
This lab requires that the gomix-playlist-2 lab be completed. If you have lost your solution, create a new project in Gomix and select the import from github option and enter edeleastar/gomix-playlist-2 to import a completed version.
Exercise 1: UX Enhancements & Exercise 3: listplaylists partial
Introduce a 'Delete Playlist' button for each playlist, represented by a trash icon.
views/dashboard.hbs
{{> menu id="dashboard"}}

<section class="ui segment">
  {{> listplaylists}}
</section>
views/partials/listplaylists.hbs
{{#each playlists}}
  <section class="ui stacked segment">
    <h2 class="ui header">
      {{title}}
    </h2>
    <p> Total Duration: {{duration}} </p>
    <a href="/playlist/{{id}}" class="ui icon button">
      <i class="icon folder open"></i>
    </a>
    <a href="/dashboard/deleteplaylist/{{id}}" class="ui icon button">
      <i class="icon trash"></i>
    </a>
  </section>
{{/each}}
Exercise 2: Delete Playlist Functionality
Make the button actually delete the denoted playlist.
routes.js
...
router.get('/dashboard/deleteplaylist/:id', dashboard.deletePlaylist);
...
controllers/dashboard.js
...
  deletePlaylist(request, response) {
    const playlistId = request.params.id;
    logger.debug(`Deleting Playlist ${playlistId}`);
    playlistStore.removePlaylist(playlistId);
    response.redirect('/dashboard');
  },
...
models/playlist-store.js
  removePlaylist(id) {
    _.remove(this.playlistCollection, { id: id });
  },
Adding a Song
Before adding a song, lets align the delete button appearance with the delete playlist. Use this icon button instead of the existing one:
<a href="/playlist/{{../playlist.id}}/deletesong/{{id}}" class="ui icon button">
  <i class="icon trash"></i>
</a>
In order to add songs, we need this new partial which provides a simple add song form:
views/partials/addsong.hbs
<form class="ui stacked segment form" action="/playlist/{{playlist.id}}/addsong" method="POST">
  <div class="two fields">
    <div class="field">
      <label>Title</label>
      <input placeholder="Title" type="text" name="title">
    </div>
    <div class="field">
      <label>Artist</label>
      <input placeholder="Artist" type="text" name="artist">
    </div>
  </div>
  <button class="ui blue submit button">Add Song</button>
</form>
Then we need to include this in the playlist view:
views/playlist.hbs
{{> menu}}
<section class="ui center aligned middle aligned segment">
<h2 class="ui header">
{{playlist.title}}
</h2>
{{> listsongs}}
{{> addsong}}
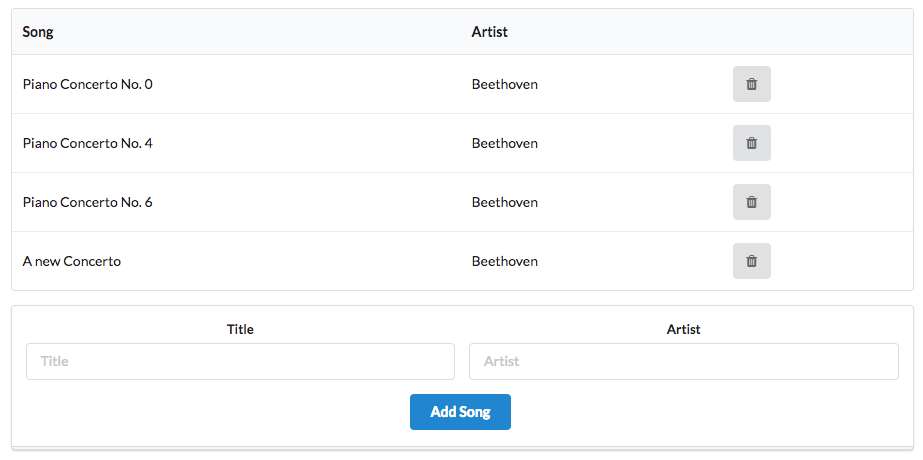
</section>This should now appear:

This requires a new route to support the POST action:
routes.js
router.post('/playlist/:id/addsong', playlist.addSong);... and this new function in the playlist controller:
controllers/playlist.js
...
  addSong(request, response) {
    const playlistId = request.params.id;
    const playlist = playlistStore.getPlaylist(playlistId);
    const newSong = {
      title: request.body.title,
      artist: request.body.artist,
    };
    playlistStore.addSong(playlistId, newSong);
    response.redirect('/playlist/' + playlistId);
  },
...
This is the implementation of the addSong method in the store:
modiels/playlist-store.js
  addSong(id, song) {
    const playlist = this.getPlaylist(id);
    playlist.songs.push(song);
  },
Try this now and verify that you can add songs.
Can you delete one of the songs you have just added? Can you delete one of the songs that have been in there already? Can you explain what is going wrong?
ID Management
Deleting a song you have manually added using the form generates the following:
Cannot GET /playlist/02/deletesong/However, pre-populated songs can still be deleted. What is going on here?
The issue is that the new songs we have added do not appear to have IDs. Looking at this list for instance:
Revealing the source:
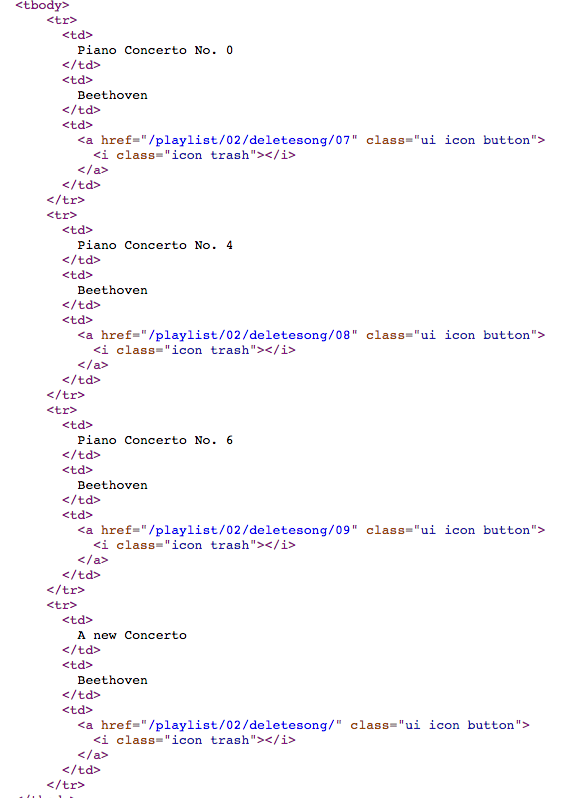
Look at the last entry - there is no ID for the new song we added.
Here is our new addsong function again:
controlers/paylist.js
  addSong(request, response) {
    const playlistId = request.params.id;
    const playlist = playlistStore.getPlaylist(playlistId);
    const newSong = {
      title: request.body.title,
      artist: request.body.artist,
    };
    playlistStore.addSong(playlistId, newSong);
    response.redirect('/playlist/' + playlistId);
  },
The object we are inserting has only two fields:
    const newSong = {
      title: request.body.title,
      artist: request.body.artist,
    };
We need to also insert a new, unique, ID for each object we create.
How do we create a new ID? This can be challenged in implement manually. However, one solution is to use Universally Unique Identifiers:
A library to generate a uuid is already in our app, we just need to import and use it
At the top of the playlist controller, we require the library:
controllers/playlists.js
const uuid = require('uuid');Now, when we are creating a playlist, we can use the library to generate a unique id for us:
  const newSong = {
    id: uuid(),
    title: request.body.title,
    artist: request.body.artist,
  };
Try this now and make sure the new songs can be deleted. View the source to reveal the uuid-style ids the new songs have.
In addition, we can add a log statement so that we can see the songs as they are added:
...
    logger.debug('New Song = ', newSong);
...
Adding playlists
Modeled on the Song addition, we can quickly implement the necessary form, route, controller function and model update to support adding a new playlist.
views/partials/addplaylist.hbs
<form class="ui stacked segment form" action="/dashboard/addplaylist" method="POST">
  <div class="field">
    <label>Title</label>
    <input placeholder="Title" type="text" name="title">
  </div>
  <button class="ui blue submit button">Add Playlist</button>
</form>
views/dashboard.hbs
{{> menu id="dashboard"}}

<section class="ui segment">
  {{> listplaylists}}
  {{> addplaylist}}
</section>
routes.js
router.post('/dashboard/addplaylist', dashboard.addPlaylist);controllers/dashboard.js
const uuid = require('uuid');
...
  addPlaylist(request, response) {
    const newPlayList = {
      id: uuid(),
      title: request.body.title,
      songs: [],
    };
    playlistStore.addPlaylist(newPlayList);
    response.redirect('/dashboard');
  },
Notice we are again using the uuid library here to generate and ID for the new playlist
modes/playlist-store.js
addPlaylist(playlist) {
  this.playlistCollection.push(playlist);
},
We should now be able to add new playlists.
Persistence
You will note that, even though we are able to add/delete playlists/songs, every time the app restarts then we are left with the same initial playlist. i.e. none of the changes we make are persisted beyond the life of the program execution.
This is the field of databases - and beyond the scope of this course for the moment. However, we can implement something like a database, but simpler, which can serve our needs. Introduce this new class into the project:
models/json-store.js
'use strict';

const low = require('lowdb');
const fileAsync = require('lowdb/lib/storages/file-async');

class JsonStore {
  constructor(file, defaults) {
    this.db = low(file, { storage: fileAsync, });
    this.db.defaults(defaults).value();
  }

  save() {
    this.db.write();
  }

  add(collection, obj) {
    this.db.get(collection).push(obj).last().value();
  }

  remove(collection, obj) {
    this.db.get(collection).remove(obj).value();
  }

  removeAll(collection) {
    this.db.get(collection).remove().value();
  }

  findAll(collection) {
    return this.db.get(collection).value();
  }

  findOneBy(collection, filter) {
    const results = this.db.get(collection).filter(filter).value();
    return results[0];
  }

  findByIds(collection, ids) {
    return this.db.get(collection).keyBy('id').at(ids).value();
  }

  findBy(collection, filter) {
    return this.db.get(collection).filter(filter).value();
  }
}

module.exports = JsonStore;
This is a wrapper around this module:
It will manage the json file we have been using, enabling updates in a convenient manner. You do not need to understand this module in depth for the moment, we will use another wrapper module to interact with it.
Here is the wraper, which is a new version of our playlist store module:
modules/playlist-store.js
'use strict';

const _ = require('lodash');
const JsonStore = require('./json-store');

const playlistStore = {

  store: new JsonStore('./models/playlist-store.json', { playlistCollection: [] }),
  collection: 'playlistCollection',

  getAllPlaylists() {
    return this.store.findAll(this.collection);
  },

  getPlaylist(id) {
    return this.store.findOneBy(this.collection, { id: id });
  },

  addPlaylist(playlist) {
    this.store.add(this.collection, playlist);
    this.store.save();
  },

  removePlaylist(id) {
    const playlist = this.getPlaylist(id);
    this.store.remove(this.collection, playlist);
    this.store.save();
  },

  removeAllPlaylists() {
    this.store.removeAll(this.collection);
    this.store.save();
  },

  addSong(id, song) {
    const playlist = this.getPlaylist(id);
    playlist.songs.push(song);
    this.store.save();
  },

  removeSong(id, songId) {
    const playlist = this.getPlaylist(id);
    const songs = playlist.songs;
    _.remove(songs, { id: songId});
    this.store.save();
  },
};

module.exports = playlistStore;
No other changes are necessary - as all access to the playlist is via the above module.
The app should work now as before, except this time changes to the playlists will be persisted to the json file. This means that if the app has to be restarted, it will have preserved any changes to the playlist in the JSON file, which will be reloaded when the app restarts.
Try this now - and keep an eye on the playlist-store.json file. Because of the way Glitch works, you may only see the updated json when you refresh the page.
To see this in action - add a new Playlist in the UX. In Glitch, see if there is any change for playlist-store.json. If there is not, reload the Glitch site, and we should expect to see the new playlist in the reloaded json file.
Exercises
If you want to download a complete version of the app as it should be at the end of this lab, then create a new Glitch project, and import wit-ict-summer-school-2017/playlist-3.
Exercise 1: Display Durations
Make sure the duration of each song and playlist is visible on the UX


Exercise 2: Add Song Duration
Modify the add song form to accept a song duration as well as title and artist:

Make sure the duration is stored in the data store, and is displayed on the playlist view.
HINT: When reading a parameter from a form representing a number, you will need to convert it from string. The Number function is one simple way of doing this:
    const newSong = {
      id: uuid(),
      title: request.body.title,
      artist: request.body.artist,
      duration: Number(request.body.duration),
    };
Exercise 3: Active Duration
The durations in each playlist are just constants stored in the database. Currently, if you add a new playlist + songs, then the duration in the playlist will be undefined.
Change this now, such that when you add a song to a playlist the duration displayed on the dashboard for each playlist will be the actual sum of the donations for all songs in the playlist.
HINT: One way of dong this is to update the addSong() method in the playlist-store object:
  addSong(id, song) {
    const playlist = this.getPlaylist(id);
    playlist.songs.push(song);

    let duration = 0;
    // Iterate over the playlist.songs array, and accumulate the duration of each
    // song into the duration local variable.
    // ...
    // ...

    // Now store the duration in playlist.store
    // ...

    this.store.save();
  },