Objectives
Explore git branching & merging features
Branching and merging
In this workshop, we'll cover the following:
Branches and branching
- What are branches, and why would you want to use them?
- How to create, checkout, change, and delete branches
Merging
- What merging means in the context of Git branches
- The most common types of merges in Git
- Fast-forward merging
- Merge commits (non-fast-forward merging)
Conflicts (and when to give up)
- What are conflicts in Git, and how do they happen?
- How to abort the mission if the conflict is too much
- How to resolve conflicts
- How to minimize the chances of hitting a conflict
Branches and branching
What are branches?
Git is a Source Control Management (SCM) tool that helps manage the different states that some source content (often software source code) over time. Each commit is a different state, and we usually visualize these as a graph over time:

In the above image, we can see that:
- newer commits are visualized on top of the older ones
- On the very top (newest) commit, there's a blue box that says "master".
- We say master is the branch that is currently "checked out".
masteris the default branch that is created when you create or clone a repository.
There are different Git visualization tools available for different
computer operating systems. Usually there's one called gitk that
comes installed with Git. Try executing gitk on the command line to
see the current branch (or gitk --all to visualize all branches and
commits).
Create a new local repository
For the purposes of this lab, we're going to create a new local repository:
Open a shell (a Git Shell on Windows, or a regular Terminal on macOS/Linux), and create a new directory by running:
$ mkdir topic05Navigate into the topic05 directory:
$ cd topic05Now initialise a Git repository from this empty directory:
$ git init
Initialized empty Git repository in C:/Users/username/topic05/.git/
Add a README.md file to the repo and commit it:
echo "Hello" >> README.md
git add README.md
git commit -m "Adding a README"
Working with branches
Using the Git command line tool, you can get a list of all of your branches:
$ git branch
* master
You can create a new branch at the same point (commit) as the current branch:
$ git branch my-new-branchLooking at the list of branches though, we can see that we're still on the master branch (the asterisk highlights the current branch):
$ git branch
* master
  my-new-branch
After creating a branch, we then need to checkout that branch to switch to it:
$ git checkout my-new-branch
Switched to branch 'my-new-branch'
Listing the branches again, we can see that we're now on the new
branch. Some other commands such as git status will give
information about the current branch.
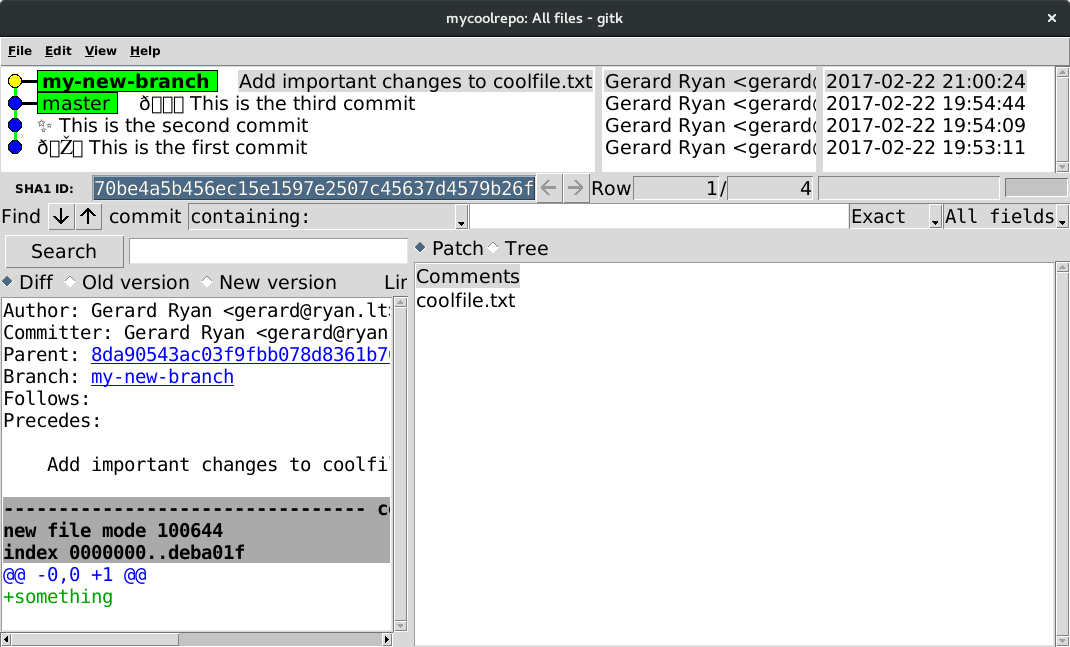
On the new branch, make a new change, and commit it.
$ echo "something" >> coolfile.txt
$ git add coolfile.txt
$ git commit -m "Add important changes to coolfile.txt"
[my-new-branch 70be4a5] Add important changes to coolfile.txt
 1 file changed, 1 insertion(+)
 create mode 100644 coolfile.txt
In gitk now, we can see that the new branch now represents a
different state than the master branch:
You can create a branch starting from any place, not just the
currently checked-out branch, by specifing that other location to the
git branch command that we used earlier. For example, we could
create a new branch from master as follows:
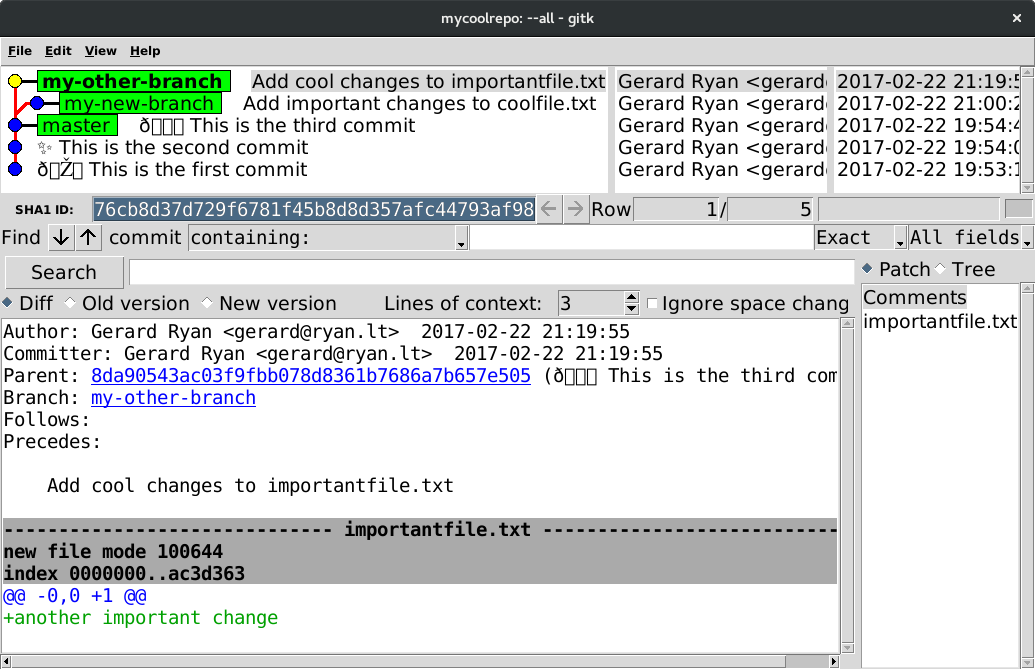
$ git branch my-other-branch masterLet's instead use the following to create and checkout the new branch in one go:
$ git checkout -b my-other-branch master
Switched to a new branch 'my-other-branch'
Again, create a new change on this branch (to a different file this time), and commit it:
$ echo "another important change" >> importantfile.txt
$ git add importantfile.txt
$ git commit -m "Add cool changes to importantfile.txt"
[my-other-branch 76cb8d3] Add cool changes to importantfile.txt
 1 file changed, 1 insertion(+)
 create mode 100644 importantfile.txt
Visualizing now with gitk --all, we should see our master branch,
and the two new branches coming out of it in different directions:
You can delete a branch like this (just an example, no need to run this):
$ git branch -d some-other-branch
error: The branch 'some-other-branch' is not fully merged.
If you are sure you want to delete it, run 'git branch -D some-other-branch'.
Since in this case, there are changes on some-other-branch that don't
exist anywhere else, we got an error message telling us that if we
really want to delete it, we need to use -D instead of -d.
What are branches really though?
A branch is simply a reference to a commit. Remember the first picture in this section? We saw a visualization of a graph of commits, with a blue box containing the name of the branch (master).
In each repository, there's a hidden directory named .git, this is
the guts of the repository. In there, there is a file at
.git/refs/heads/master which contains nothing but the sha1 hash of
the commit that the branch is pointing at.
What is HEAD?
HEAD is a special pointer that points to "whatever is currently
checked out". If you're on a particular branch, it will contain a
reference to that branch:
$ cat .git/HEAD
ref: refs/heads/master
Merging
What does merging mean?
In the last section, we learned about creating new branches. Often branches are created temporarily to work on a specific piece of work. When that work is ready, then those changes are brought back into the original branch again.
Remember the branches from the last section? Originally there was the
master branch, and then we created a branch called my-new-branch,
where we made changes. We can now merge those changes back into
master branch, and delete the my-new-branch since we won't need it
any longer.
The simplest form of merging is fast-forward merging. Since branches
are just references to commits, and my-new-branch is a direct
descendant of the master branch; we can just update the master
branch to point to the same commit as my-new-branch.
This is the default way that Git will merge when the target branch is
an ancestor of the source branch. First, checkout the target branch
(master in this case), and then use the merge subcommand to bring
the changes from the source branch (my-new-branch) into this
branch:
$ git checkout master
Switched to branch 'master'

$ git merge my-new-branch
Updating 22ba038..fa8df7e
Fast-forward
 coolfile.txt | 1 +
 1 file changed, 1 insertion(+)
 create mode 100644 coolfile.txt
Now we can delete the my-new-branch, since we've incorporated all
the changes into master:
$ git branch -d my-new-branch
Deleted branch my-new-branch (was c1e11ad).
Merge commits
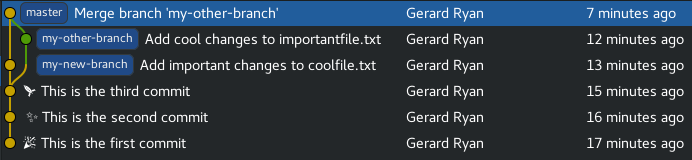
In some cases, the target branch will not be a direct ancestor of the source branch. Here, the default action is to create a new commit which has two (or more) parent commits and a message.

While on the master branch, we can now merge the changes from the other branch as follows:
$ git merge my-other-branch
Merge made by the 'recursive' strategy.
 importantfile.txt | 1 +
 1 file changed, 1 insertion(+)
 create mode 100644 importantfile.txt
The default commit message editor will have appeared here, to give you the opportunity to modify the commit message for the new commit. The default is usually fine.
Usually a merge commit will not contain any changes to files itself: the changes will be in its ancestors. Sometimes when merging two divergent branches though, there will be conflicting changes on either side of the merge. In this case, there may be changes needed in the merge commit to resolve the conflicts. We'll talk about conflicts later.
Conflict resolution
What are conflicts, and how do they happen?
Conflicts in Git occur when trying to integrate changes from two different states, where different changes are made in one place. The most common case is when performing a merge of one branch into another, where there's a change to a particular line in a particular file on both sides of the merge.
Git doesn't know what to do automatically, so it just stops in the middle of the action, and asks you to intervene.
Let's cause a conflict
First, let's make a new branch and add a file:
$ git status # Check that we've checked out master
$ git checkout -b the-left
Switched to a new branch 'the-left'

$ echo "Left is the best" >> importantfile.txt

$ git add importantfile.txt
$ git commit -m "Left is the best"
[the-left 511709c] Left is the best
 1 file changed, 1 insertion(+)
 create mode 100644 importantfile.txt
Next, for the purposes of demonstration, let's create another branch,
called the-right:
# Checkout a new branch, `the-right`, from `master`
git checkout -b the-right master
Switched to a new branch 'the-right'

$ echo "Right is the best" >> importantfile.txt
$ git add importantfile.txt
$ git commit -m "Right is the best"
[the-right 511709c] Right is the best
 1 file changed, 1 insertion(+)
 create mode 100644 importantfile.txt
We've made changes here in the same file, in two separate
branches. If we try to integrate these branches with a merge,
we're going to see a conflict. Let's merge the-left into
the-right to see a conflict:
# Run `git status` - we should be on the `the-right` branch
$ git merge the-left
Auto-merging importantfile.txt
CONFLICT (add/add): Merge conflict in importantfile.txt
Automatic merge failed; fix conflicts and then commit the result.
We've now got a conflict that we need to resolve before we can merge. Check the status of our repo:
$ git status
On branch the-right
You have unmerged paths.
  (fix conflicts and run "git commit")
  (use "git merge --abort" to abort the merge)

Unmerged paths:
  (use "git add <file>..." to mark resolution)

    both modified:   importantfile.txt

no changes added to commit (use "git add" and/or "git commit -a")
Inspect the diff between these conflicting files:
$ git diffdiff --cc importantfile.txt
index 91fe0e5,e188c8f..0000000
--- a/importantfile.txt
+++ b/importantfile.txt
@@@ -1,2 -1,2 +1,6 @@@
another important change
++<<<<<<< HEAD
+Right is the best
++=======
+ Left is the best
++>>>>>>> the-leftHow to resolve conflicts
We've got a conflict in importantfile.txt. Open this in an
editor and let's walk through how to resolve this conflict.
another important change
<<<<<<< HEAD
Right is the best
=======
Left is the best
>>>>>>> the-left
We want to resolve the conflict so that we end up with an integrated change like the following:
another important change
Right and Left are both equally good
With our conflict manually resolved, we need to git add:
# Stage our change and mark conflict as resolved
git add importantfile.txt
Lets check our git status once more:
$ git status
On branch the-right
All conflicts fixed but you are still merging.
  (use "git commit" to conclude merge)

Changes to be committed:

    modified:   importantfile.txt
Finally, commit the integrated change:
$ git commit
# Will prompt for an $EDITOR message
[the-right d87d6f5] Merge branch 'the-left' into the-right
Can I just abort and go back to where I was before?
Yes, you can - the git status command we ran earlier tells us what
to do (git merge --abort)
How to minimize the chances of conflicts
Try to keep commits small & integrate your changes often.